


Contents
- About System Administrators
- How to…
About System Administrators
The Super Admin
When you subscribe to Celiveo 365, an Administrator User is automatically created for the administrator who has performed the subscription.
This user must be a Printer Administrator in entra ID, in Celiveo 365 he gets administrative privileges over all users and all printers, and hence is referred to as Super Admins. Super Admins can appoint other domain users as Admins or Super Admins, as long as they are Printer Administrator or Printer Technician.
Super Admins can appoint Regular Admins based on Entra ID groups to have Entra ID RBA-based administrators.
Admins have control over a Community and identified by the fact their tags are not all wildcards. Their scope is limited by those tags.
As soon as an Administrator or super Administrator loses his Printer Technician or Printer Administrator role in Entra ID, he can’t connect anymore to the Celiveo 365 portal. This deep integration allows to ensure a total security, and Celiveo 365 does not create another layer of users management.
What is a Community?
A community is a group of users, workstations, printers, and administrators that have a common characteristic. For example, a group of users, workstations, printers, and administrators, located in the same building.
The community that a user or printer belongs to is determined by the tags assigned to them. We will use an example to illustrate the concepts behind system administrators and communities.
An example is a company distributed across several cities. The company uses tags to identify places. Although Celiveo 365 supports up to five tags, they use only three, which identify Country, State and City. A user tagged USA, California, San Francisco, belongs to the San Francisco community. A user tagged USA, California, *, belongs to the California community, which is a super set of San Francisco and Sacramento.
Regular Admins
Super Admins can pick a user who belongs to the California community and make that user an Administrator. That user then becomes an administrator for the California community. In this manner the Super Admin of a large organization is able to delegate administrative privileges for each community to regular admins who are responsible for their community.
The administrator for California can pick another user belonging to the California community and make that user an administrator. As such California will now have more than one regular administrator. In this manner the Admin for California is able to delegate duties to a peer to assist with administration. Additionally, California administrators can delegate administrative duties for the smaller community of San Francisco to a user who belongs to the San Francisco community. Using this technique of defining communities and appointing admins for each level of community, you can implement a multi-level admin strategy for an organization.
An administrator will not see what happens in other communities, but will see and have admin control on his community’s sub-communities.
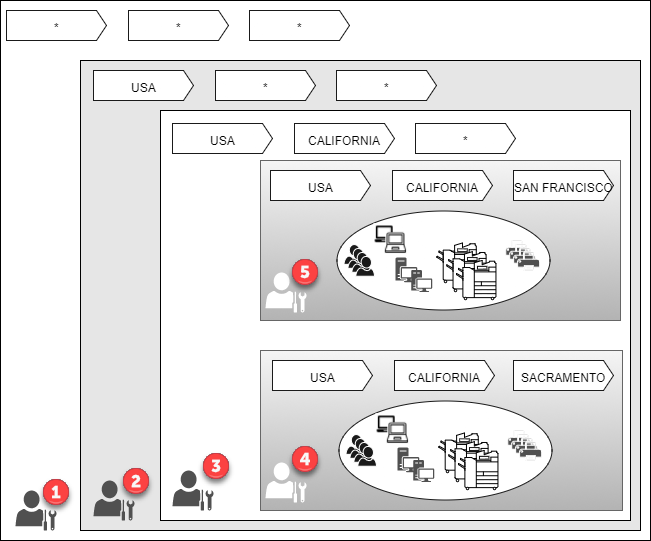
Legend
1- Default Admin – Super Admin created automatically at installation
2- Regular Admin – Can handle all communities within the USA
3- Regular Admin for California (including San Francisco and Sacramento)
4- Regular Admin for Sacramento.
5- Regular Admin for San Francisco.
Print Rules and Access Control Rules
A regular admin has access to all Print Rules and Access Control Rules created by the administrators above them. However, they cannot modify these rules.
For example, the California administrator has access to, and can make use of all the rules created by the Super Admin and USA Admin. However, the California Admin cannot modify any of these rules. On the other hand, the California Admin can modify any rule that the San Francisco and Sacramento administrators have created.
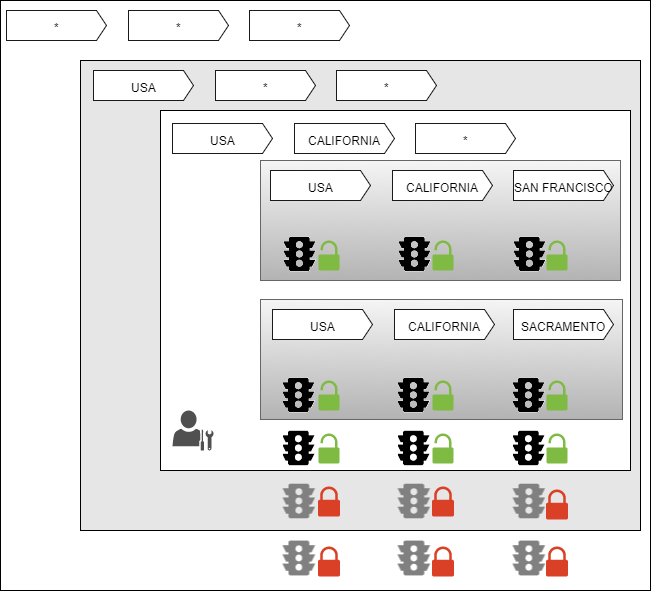
The Sacramento administrator can see can make use of the rules created by the Super Admin, USA Admin and California Admin, but cannot modify them. The Sacramento administrator cannot access any rules that the San Francisco Admin created.
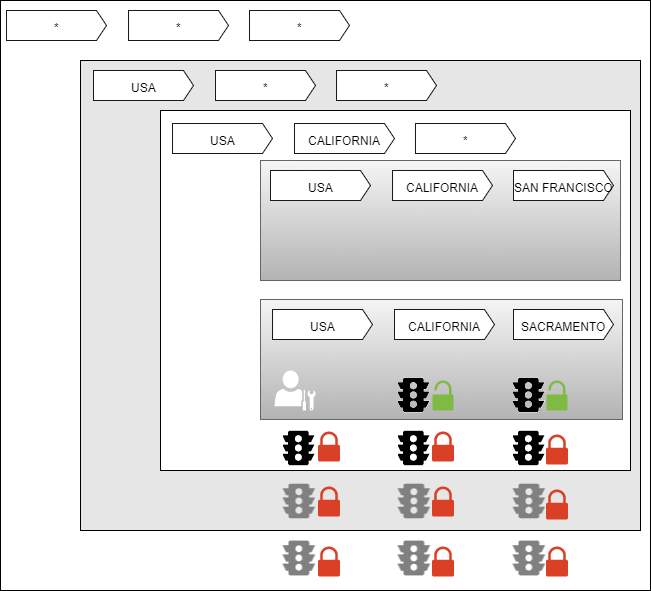
Visibility of Printers, profiles and tracking information in the Web Admin
When a regular admin logs into Celiveo 365 Web Admin, they can only see the printers, tracking information, profiles that belong to their community or the parent communities.
Effective Community
An administrator user can inherit a community setting in more than one way.
- By the direct assignment of tags to their user account.
- By assignment of tags to a user group. A user can be a member of more than one user group.
Whenever you assign a set of tags to a user or to a user group, you also assign a property known as “priority”. When a user inherits community settings from more than one source, the community (tag setting) with the highest priority takes precedence over the others.
How to…
- From the main menu, click
![]() .
.
![]()
- Click on users
![]() . then add user
. then add user ![]()
- Click the
![]() icon next to the [Search box], to list first 1000 users belonging to the selected Entra ID. You can also search for particular user/ users by providing short names or characters.
icon next to the [Search box], to list first 1000 users belonging to the selected Entra ID. You can also search for particular user/ users by providing short names or characters.
 .
.

 icon next to the [Search box], to list first 1000 users belonging to the selected Entra ID. You can also search for particular user/ users by providing short names or characters.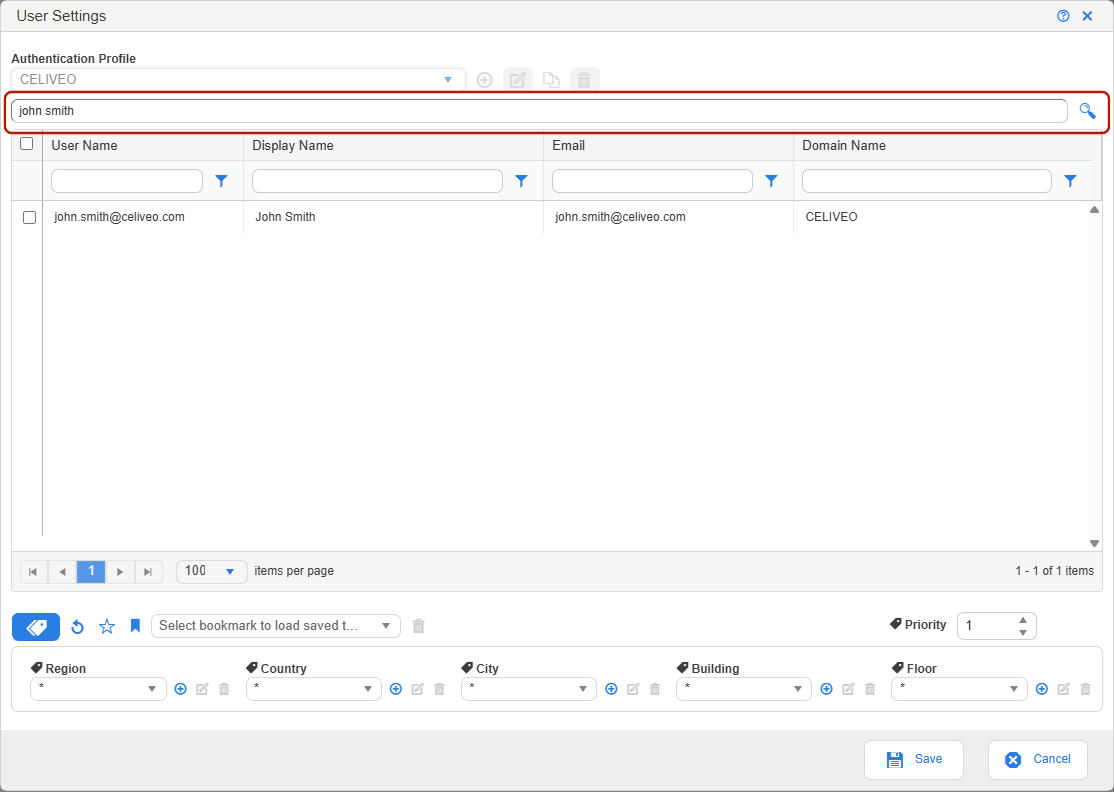
- Select the users you want to add to the user list.
- At [Priority], assign a priority setting for the community (tag assignment) to be assigned to the new users. The highest priority is 100, and lowest is 1. When a user inherits a community from more than one source, the community with the highest priority overrides the others.
![]()
- Click [Save].
- Now Domain Users can be used to login on the Web Admin.

Link Printers to a Community
- From the List of Printers, select the printers you want to specify tags for and click
![]() .
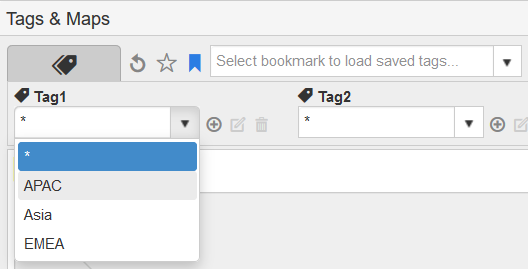
. - Select the tags for the printers.
![]()
- If any tag drop-down list is empty, or does not contain the value you need:
- Click
![]() next to the drop-down.
next to the drop-down. - Specify the new value for the tag and click [Save].
- Click
- Click [Save]. The tags are assigned to the printers.
 .
.
 next to the drop-down.
Label Tags
- Click
![]() .
. - Click
![]()
![]()
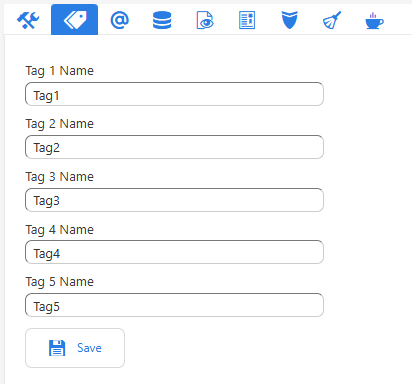
- Label the tags as required and click [Save].
 .
.
Post your comment on this topic.