Collect MUP Configuration Settings
- Go to your Celiveo 365 tenant URL (eg: http://companyname.celiveo365.com/) and confirm your MUP Printer Description Name.
- In your Azure portal: https://portal.azure.com/.
- Go to Universal Print > Manage Printers.
- Select the Microsoft Universal Printer with the same Description Name as the one defined on Celiveo 365 WebAdmin.
- Press the MUP print queue name.
- Copy the Printer ID, Share Name and Share ID as this information will be used later when creating a Microsoft Endpoint deployment Profile.
Create a Microsoft Endpoint Printer Configuration Profile
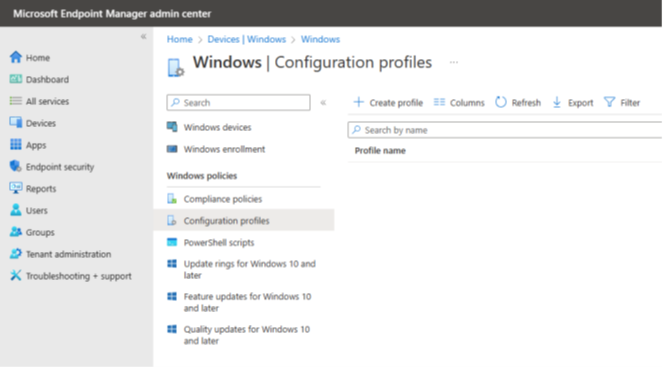
- In the Microsoft Endpoint Manager Admin Center, go to Home > Devices > Windows > Configuration Profiles > Create profile.
- Under Platform, select Windows 10 and Later.
- Under Profile Type, select Settings Catalog.
- Press Create.
- Step 1 (Basics) Provide a name description to the profile and press Next.
- Step 2 (Configuration Settings) Press +Add Settings.
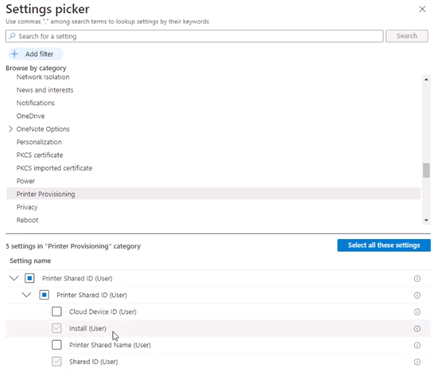
- In the Settings Picker select Printer Provisioning.
- Then select Printer Shared ID, Install (User) and Shared ID (User) and exit the menu.
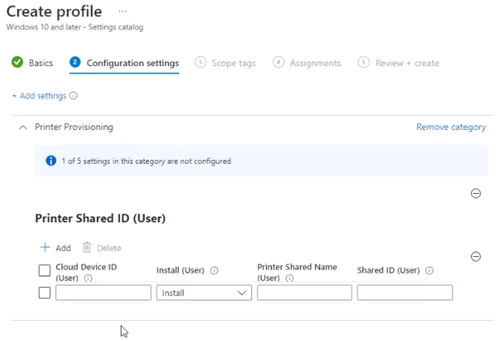
- The Printer Provisioning should now have:
- Cloud Device ID – This is the Printer ID collected earlier in MUP configuration.
- Printer Share Name – This is the Printer Share name collected earlier in MUP configuration.
- Shared ID – Shared Print Queue ID collected earlier in MUP configuration.
- Press Next.
- Step 3 (Scope Tags) Press Next again as in this example we will not use Scope tags.
- Step 4 (Assignments)
- Press Add Groups.
- Define to which groups within the organization this print queue will be automatically deployed and press Select.
- Press Next.
- Step 5 (Review and create)
- Review all the content in the wizard and press Create to create the profile.
- All the users who fall under this policy deployment profile will receive the MUP print queue automatically upon login.
Last modified:
1 September 2025


Post your comment on this topic.